

Installation guide: How to Tank a Wetroom
How to Tank a Wetroom
This step by step guide will take you through the process required for a successful installation – teaching you how to tank a wetroom.
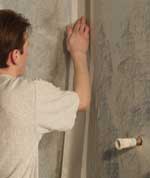
1. Applying Aquaproof primer
Walls and floor of wetroom are primed with Aquaproof primer.

2. Applying Aquaproof tape
Aquaproof tape is bedded into a freshly applied stripe coat of Aquaproof compound at all corners and joints.
3. Aquaproof pipe sleeve
Pipe sleeves are pushed over pipe entries and bedded into the fresh Aquaproof compound.
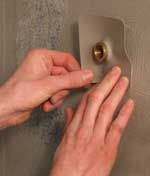
4. Aquaproof shower outlet sleeve
Shower outlet sleeves are bedded into Aquaproof Compound and dressed down into the shower outlet (between the outlet body and clamping ring).

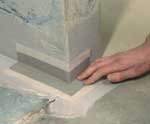
5. Aquaproof Corners
Pre-formed corners are bedded into the fresh Aquaproof compound.
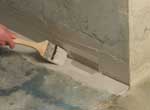
6. Overpainting
All tapes, corners and sleeves are overpainted with a generous layer of Aquaproof compound.
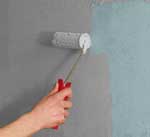
7. Apply Aquaproof compound
Finally, 2-3 coats of Aquaproof compound are applied to the entire area to be waterproofed.
Following all of the above steps will ensure the area remains watertight: avoiding all the usual problems with dampness that plague improperly tanked wetrooms. Substandard tanking products or installation often leads to the whole area being torn up to start from scratch. This mistake can be costly so it’s worth getting it right the first time!
All our Aquaproof tanking products are fully approved for use in wet rooms and carry a 10 year guarantee. Full details on our Wetroom Tanking shop page.